Use your own domain name with Tinify CDN
Setting up your own domain name with Tinify CDN enables you to maintain your brand identity and create a more consistent experience for your user while utilizing Tinify's global Multi-CDN.
Tinify CDN is secure by default. To use a custom domain with Tinify CDN, you will need a valid TLS/SSL certificate for the domains that you want to use.
Prerequisites
Before you can proceed, please ensure that you have the following prerequisites in place:
- a registered domain
- a CDN account with the Enterprise plan
- Permission to modify the DNS records of your domain
- a valid X.509 SSL/TLS certificate from a trusted CA and a matching private key
Note: A trusted certificate authority (CA), is an organization that vouches for the identity of websites, making them trustworthy and secure.
Instructions on how to set up own domain
- Start the wizard
- Import your SSL/TLS certificate
- Setup your CDN Aliases
- Configure your DNS
- Verify the setup
Important: Tinify CDN only allows one certificate to be installed on your CDN site. This means that when you configure your own domain name, your CDN site can only be used with your domains and any usage of https://xxxxxx.tinifycdn.com cause an 'this connection is insecure' error message to appear.
1. Start the wizard
To start configuring your CDN site with your own domain name, we will guide you through a configuration wizard.
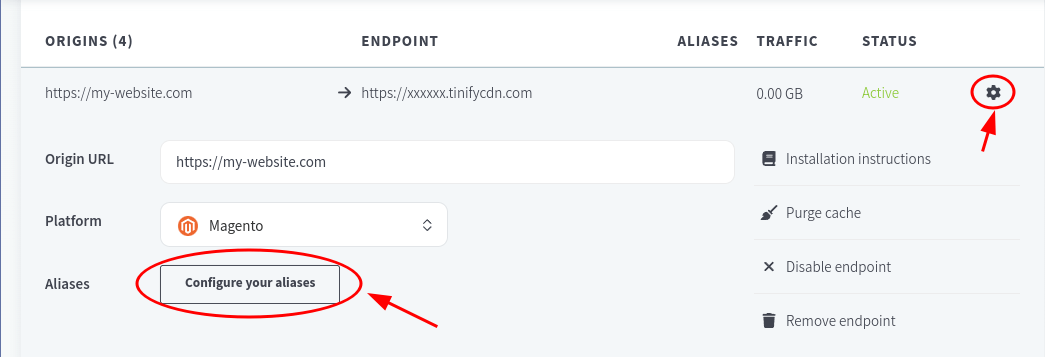
- Go to your Tinify CDN dashboard.
- Click the gear icon to expand the settings for your site.
- Click "Configure your aliases".

2. Import your SSL/TLS certificate
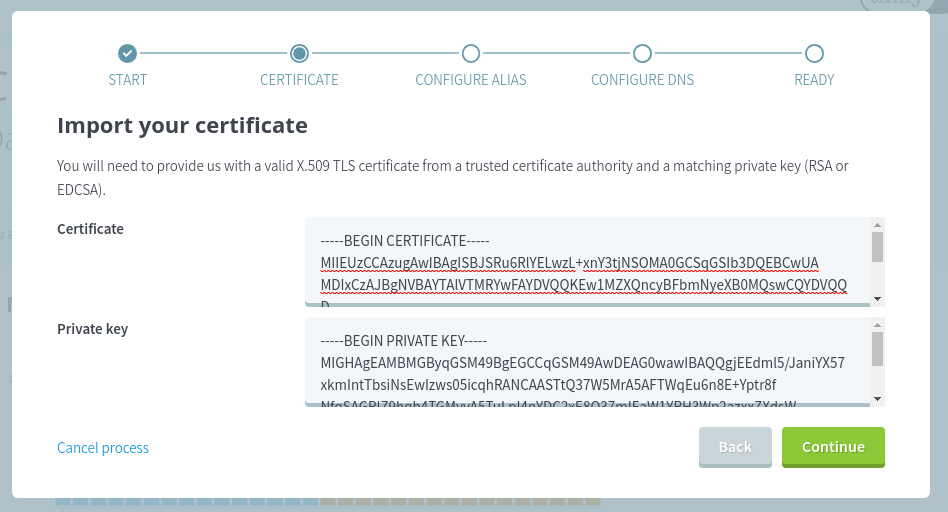
To import your SSL/TLS certificate, you will have to enter your certificate and its matching private key as text in (PEM encoded) in the corresponding text boxes. You are allowed to pass the full certificate chain, or just the leaf.

Tinify will verify that the certificate is signed with the given private key and that the certificate is not expired.
The following types of certificates are supported:
- Domain validation (DV)
- Organization Validation (OV)
- Extended Validation (EV)
These certificates may be wildcard, single or multi-domain (SAN) certificates.
Other requirements of the certificate/private key pair are:
- Certificate validity may not exceed 13 months (as required by most modern browsers)
- The key may not be password protected
- The RSA key type may not be larger than 2048 bits
- The ECDSA key type must be prime256v1 elliptic curve
3. Setup your CDN Aliases
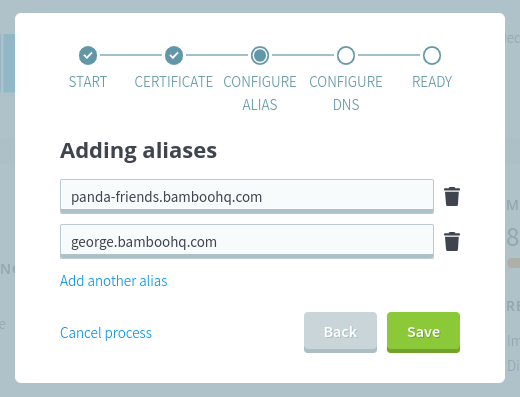
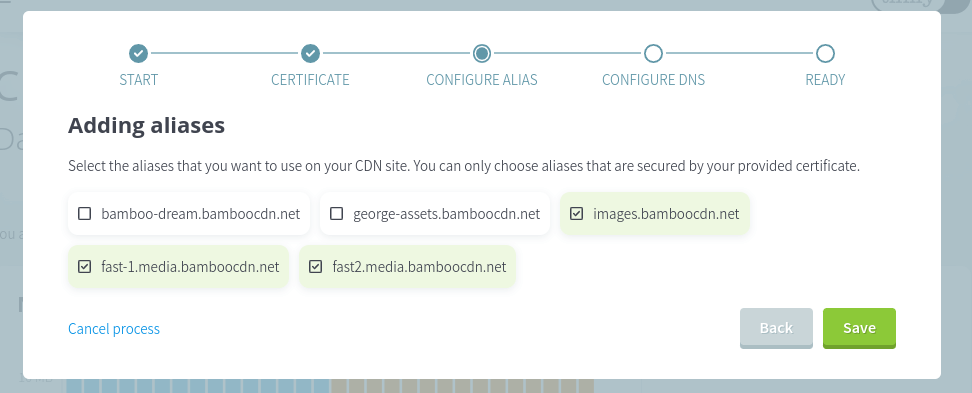
In this step you will have to choose the domain names you want to use for your CDN site. Keep in mind that you can only choose a domain name that is covered/secured by the certificate provided in the previous step. However, there are some limitations to consider:
- A CDN site can only have 5 aliases attached.
- All aliases must be unique across the Tinify CDN platform.
- Apex (or root / naked) domains are not supported unless your DNS provider supports the ANAME / Alias record type.
- Wildcard certificate:
- A wildcard certificate can secure an unlimited amount of subdomains under the main domain. To use this type of certificate you will have to specify the domain names you want to use with this certificate.

With a wildcard certificate, you specify the domains. - Single / Multi domain (SAN) certificate:
- You will have to select the domains that are in the provided certificate.

4. Configure your DNS
Please wait for a few minutes so that Tinify can set up your certificate and aliases on your Multi CDN site. Once the DNS target is visible, it means that your domain name and certificate is successfully configured on the underlying content delivery networks. You can now create or modify your DNS to make use of Tinify CDN.
Important: At this point, direct access to your CDN site via the https://xxxxxx.tinifycdn.com URL is not advised as TLS connections will not work. A Tinify CDN site only supports a single certificate for a trusted TLS connection.
It is strongly advised that before you change an existing CNAME to use Tinify CDN that you lower the TTL to a lower number, for example 60 seconds, and wait for the old TTL to expire. This will ensure that if a configuration issue arises, a revert rollback can be executed promptly.
Configuring the DNS record may vary depending on the CDN provider, but the process is essentially the same. You need to add a CNAME record for your domain that points to the (CNAME) endpoint of your CDN site. Below, we have gathered instructions for some common DNS providers to aid you in how to configure your DNS;
5. Verify the setup
Verifying that your DNS is configured correctly is important to ensure that your content will be served correctly and securely. Due to global DNS caching, it might take some time for all DNS resolvers to respond with your Tinify CDN endpoint. This largely dependents on the TTL set on the old record in case you modified an existing record.
Do a DNS check with a global DNS checker
To check the DNS records for your domain name, you can use one of the many online tools available These online tools check your domain from different locations across the globe. Make sure you resolve your domain with the CNAME type.
if you have set up your domains using ALIAS or ANAME: use A as the record type.
Two popular tools you can use are:
Load some files over the CDN using your custom domain
You can verify that the CDN(s) and your DNS is properly working by loading some files from the CDN. To do this, manually input the URL in the browser. Make sure you open the browseri's console and navigate to the network tab to view the response headers, and if there is a tinify-optimization. If there is a “tinify-optimization” header present, this indicates that your files are indeed being routed through Tinify CDN!
Frequently asked questions
How do I get a certificate?
Obtaining a TLS (Transport Layer Security) certificate, often referred to as an SSL (Secure Sockets Layer) certificate can be done through a trusted CA (Certificate Authority). For more information regarding the process, kindly refer to the resources provided by the CA you opt for.
The minimum requireemnt for Tinify is a domain validation certificate (DV) along with its private key. Here are the usual steps to follow:
- Choose a Certificate Authority (CA). You can pick a CA directly, or find a reseller. Here are some options:You may also check with domain registrars as they often sell certificates.
- Create a CSR (Certificate signing request) and obtain the private key
- Keep this private key secure
- Submit the CSR to the CA
- Verify ownership of your domain name that you request the certificate for
- After verification, receive the certificate, and submit it to Tinify with the private key from step #2
Note: Certificates have an expiration time! Therefore, it"s crucial to have a plan in place to ensure the timely renewal of your certificate.
What happens if my certificate expires?
If your certificate expires, Your end-users will fail to connect to your domain on Tinify CDN and will be presented with a "This connection is not secure" error message. To avoid this, we will send you an email before the expiration date so that you can take action. In response, you will have to either replace the certificate or delete it and fall back to your personal tinifycdn.com endpoint.
Can I use a self-signed certificate?
Tinify CDN is meant for public traffic. Self-signed certificates are not trusted by default and therefore are not supported.
Glossary
- Tinify CDN
- A multi-CDN network that optimizes and minifies your content while delivering it to your end-users through the fastest available network.
- TLS/SSL certificate
- A digital certificate that provides authentication for a website and enables an encrypted connection. It is required for a secure HTTP connection and the well-known padlock icon in the browser URL bar.
- X.509
- A standard format for public key certificates.
- Trusted Certificate Authority (CA)
- An entity that issues digital certificates and is regarded as a trusted entity by all major browsers and operating systems.
- Domain Validation (DV)
- A type of x.509 certificate where the CA checks the right of the applicant to use a specific domain name.
- Organization Validation (OV)
- A type of x.509 certificate that validates the domain ownership and the organization's information included in the certificate.
- Extended Validation (EV)
- A type of x.509 certificate that offers the highest level of validation by the CA.
- Wildcard certificate
- A digital certificate that is applied to a domain and all its subdomains.
- Single/Multi-domain (SAN) certificate
- A certificate that secures multiple domain names and subdomains.
- CDN Aliases
- Alternate hostnames/domains for a CDN endpoint.
- Apex (or root/naked) domains
- The highest level of a domain in the DNS hierarchy, without any subdomains.
- ANAME/ALIAS record
- A type of DNS record that allows you to point a domain name to another domain name.
- CNAME record
- A type of DNS record that maps one domain name to another.
- TTL (Time To Live)
- A mechanism that limits the lifespan of a cached DNS request.
- CSR (Certificate Signing Request)
- A block of encoded text that is given to a Certificate Authority when applying for an SSL Certificate.
- Transport Layer Security (TLS)
- A protocol that ensures privacy between communicating applications and their users on the internet.
- Secure Sockets Layer (SSL)
- A predecessor to TLS, it's also a protocol for establishing authenticated and encrypted links between networked computers.
